A “”Fairy”” Cute DIY for National Tooth Fairy Day
Wednesday - August 15th, 2018
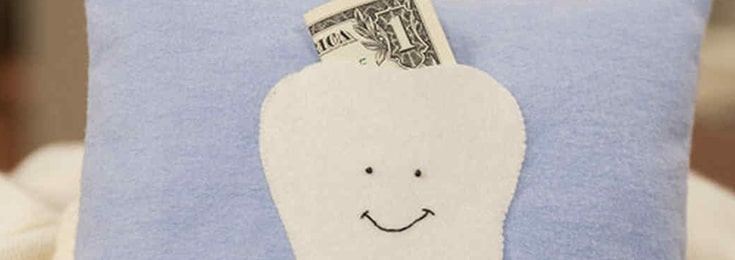
In honor of National Tooth Fairy Day, we’ve brought you a fun and simple Tooth Fairy Pillow DIY. Not only is this Tooth Fairy Pillow the cutest thing we’ve ever seen, but we also think it’s the perfect place for your child to put their tooth for safe-keeping. So, embrace your inner Martha Stewart, get out your hot glue gun, and say goodbye to “Lost Tooth” tears now!
Materials Needed:
- White felt
- Scissors
- Pen (Water-soluble marking pen if you’re truly Martha Stewart)
- Black embroidery floss OR a Permanent Marker
- Googly eyes
- Hot glue gun
- 1/4 yard fabric
- Batting
- Sewing Machine or sewing needle & thread
- Tooth Template
Steps:
- Print tooth template and cut out the shape (Note: Cardstock paper would work best!)
- Trace template onto white felt and cut out the shape.
- Put a face on the tooth! Start by gluing two googly eyes onto the tooth. Using the black embroidery thread (so Martha, right?) to hand-stitch a smile. But if you’re looking for a quick fix, a permanent marker will do the trick ;).
- Cut two pieces of 9-by-9 inch squares of your selected fabric.
- Sew the 9-by-9 inch squares together leaving about 1/4 inch seam space and a 4 inch opening for stuffing. And if you don’t have the time to sew (because who does), whip out that hot glue and glue the edges together.
- Turn sewed squares right side out, stuff with batting, and hand-stitch (or hot glue) to close the opening.
- Take your smiling tooth, center it on one of the fabric squares, and get to hot gluing! NOTE: Be sure to leave the top open to create a tooth-holding pocket.
- Place a tooth in and wait for the Tooth Fairy to visit!
Thought the DIY was too complicated still? Take a short-cut by using a pre-made pillow (shh, don’t tell Martha). Take an old pillow, follow steps 1-3, and glue on your felt tooth. It’s (literally) as easy as 1, 2, 3!
*Craft adapted from Martha Stewart’s Tooth Fairy Pillow Craft
**Photo Taken from: marthastewart.com